|
Introduction
The flashlight is a solar-powered or battery-operated mechanism allowing its user to see light in dark areas. For descriptive purposes, the battery-powered flashlight will be the focus.
This hand-held device provides a function similar to that of a kerosene lantern: to have sight while navigating in the dark. However, unlike the lantern, the flashlight does not use fire or kerosene to illuminate the surrounding area. Dangers of the historic lantern have created the need to advance to a new technology with increased mobility and safety improvements.
The following description allows executives to understand the utilization of this tool providing the customer with a need for this product. However, previous knowledge is not required to operate this device as the parts are simple and few indicating a product line that is cost-effective for the company.
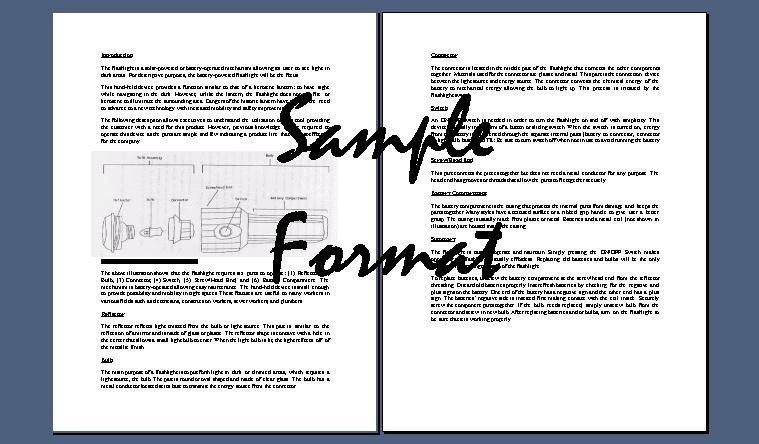
The above illustration shows that the flashlight requires six parts to operate: (1) Reflector, (2) Bulb, (3) Connector, (4) Switch, (5) Screw/Head End, and (6) Battery Compartment. The mechanism is battery-operated allowing easy maintenance. The hand-held device is small enough to provide portability and mobility in tight spaces. These features are useful to many workers in various fields such as electricians, construction workers, sewer workers, and plumbers.
Reflector
The reflector reflects light emitted from the bulb or light source. This part is similar to the reflection of a mirror and is made of glass or plastic. The reflector shape is concave with a hole in the center that allows a small light bulb to enter. When the light bulb is lit, the light reflects off of the metallic finish.
Bulb
The main purpose of a flashlight is to put forth light in dark or dimmed areas, which requires a light source, the bulb. The part is round or oval shaped and made of clear glass. The bulb has a metal conductor located at its base to transmit the energy source from the connector.
Connector
The connector is located in the middle part of the flashlight that connects the other components together. Materials used for the connector are plastic and metal. This part is the connection device between the light source and energy source. The connector converts the chemical energy of the battery to mechanical energy allowing the bulb to light up. This process is initiated by the flashlight switch.
Switch
An ON/OFF switch is needed in order to turn the flashlight on and off with simplicity. This device is usually in the form of a button or sliding switch. When the switch is turned on, energy from the battery is transferred through the separate internal parts (battery to connector, connector to light bulb base). NOTE: Be sure to turn switch off when not in use to avoid running the battery down.
Screw/Head End
This part connects the pieces together but does not need a metal conductor for any purpose. The head end has grooves or threads that allow the parts to fit together securely.
Battery Compartment
The battery compartment is the casing that protects the internal parts from damage and keeps the parts together. Many styles have a textured surface or a ribbed grip handle to give user a better grasp. The casing is usually made from plastic or metal. Batteries and a metal coil (not shown in illustration) are housed inside the casing.
Summary
The flashlight is easy to operate and maintain. Simply pressing the ON/OFF Switch makes operating the flashlight virtually effortless. Replacing old batteries and bulbs will be the only necessity for prolonged usage of the flashlight.
To replace batteries, unscrew the battery compartment at the screw/head end from the reflector threading. Discard old batteries properly. Insert fresh batteries by checking for the negative and plus signs on the battery. One end of the battery has a negative sign and the other end has a plus sign. The batteries negative side is inserted first making contact with the coil inside. Securely screw the component parts together. If the bulb needs replaced, simply unscrew bulb from the connector and screw in new bulb. After replacing batteries and/or bulbs, turn on the flashlight to be sure that it is working properly.
|